Rigatoni with Eggplant Puree

I wanted to make a pasta dish that had sauce different from pesto, marinara, or bolognese, and Giada de Laurentiis’s healthy eggplant-based sauce sounded interesting!  The original recipe calls for mint instead of basil, but I thought basil would pair better with a protein.  I picked shrimp for this dish, but I think chicken would go just as well.

Here is the recipe as adapted from Giada’s.  If you want to eat this with meat, simply cook your meat through separately, cut into bite size pieces, and mix it in with the pasta and sauce.  I sauteed a pound of shrimp in a little oil, salt, and pepper and added it in during step 5.

INGREDIENTS:

  • 1 medium eggplant, cut into 1-inch cubes
  • 1 pint (2 cups) cherry tomatoes
  • 3 cloves garlic, peeled
  • 3 tablespoons olive oil
  • 1 teaspoon kosher salt
  • 1 teaspoon freshly ground black pepper
  • 1/4 teaspoon red pepper flakes (or more if you like it spicy)
  • 1 pound dried rigatoni pasta
  • 1 cup mushrooms, stems removed and cut in half
  • 1/4 cup torn fresh basil leaves, plus a couple extra, slivered, to finish
  • 3 tablespoons olive oil
  • 1/2 cup grated Parmesan cheese
  • 1/4 cup toasted pine nuts

DIRECTIONS:

  1. Heat oven to 400 degrees F. Line a large baking sheet with parchment paper.
  2. In a large bowl combine the eggplant, cherry tomatoes, garlic, 3 tablespoons olive oil, salt, pepper, and red pepper flakes. Spread the vegetables out in an even layer on the baking sheet. Roast in the oven until the vegetables are tender and the eggplant is golden, about 35 minutes.

    Roasted Eggplant and Tomatoes
  3. Meanwhile, bring a large pot of salted water (salty like the ocean!) to a boil over high heat. Add the pasta and cook until tender but a bit under done, about 8 to 10 minutes. Drain pasta but reserve 2 cups or so of the cooking water.
  4. Transfer the roasted vegetables to a food processor or blender. Add the torn basil leaves, mushrooms*, and additional 3 tablespoons olive oil. Blend until almost smooth.

    Ready to Pulverize
  5. Return the pasta to the cooking pot, pour sauce over it and about 1/2 cup of cooking water and cook together over medium-high heat for 1 to 2 minutes, tossing occasionally to coat pasta evenly. Add more pasta cooking water a little at a time if needed to loosen the sauce.
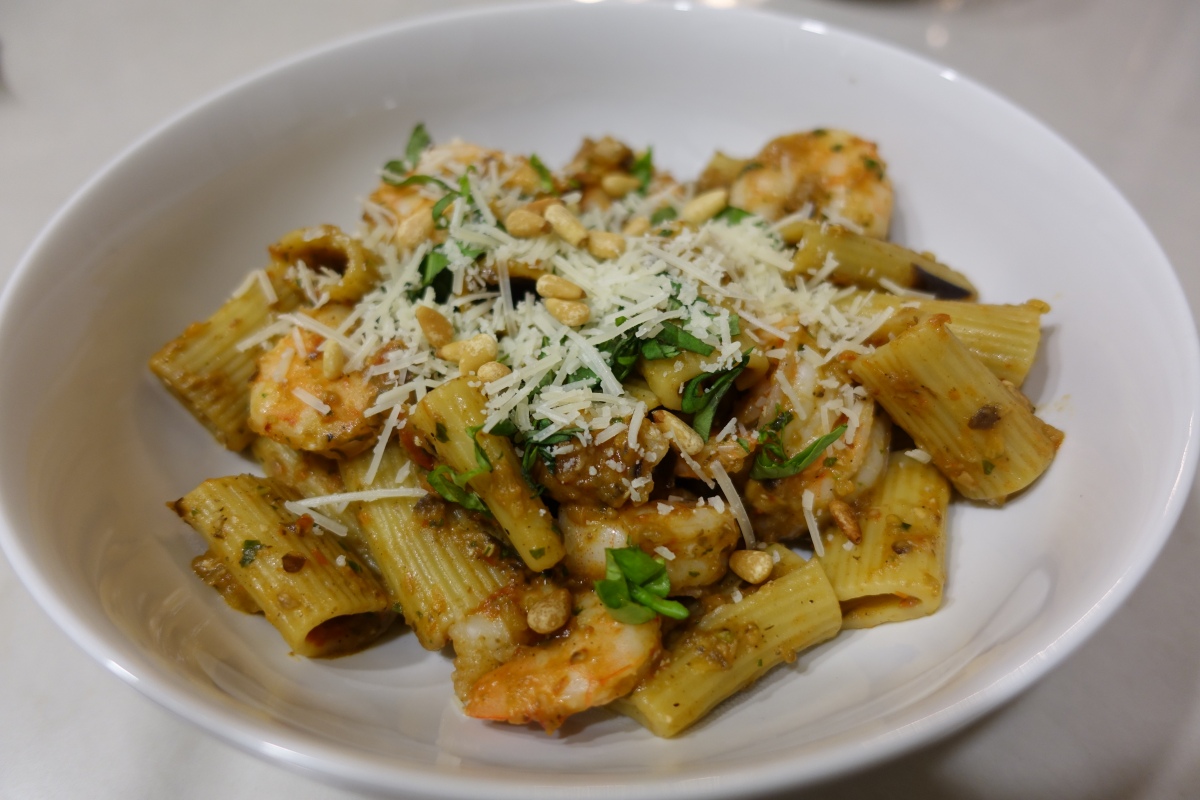
  6. Transfer pasta and sauce to a serving bowl; garnish with extra herbs, pine nuts and parm, and serve.

*The original recipe didn’t call for mushrooms, but I had bought a package to throw in a vegetable soup and had some left over.  I had meant to roast them with the eggplant and tomatoes but forgot. I threw them in raw, and they soaked up all the sauce-y goodness once pureed, and cooked enough in step 5.  The mushrooms added a nice earthy compliment to the sauce, but simply omit if mushrooms aren’t your thing!

You can easily make this vegan by forgoing the cheese.

This was earthy and delicious!  I made this the first time a few months ago, while you could still get local eggplant and tomatoes.  I made this again recently, and the produce was from South America.  I didn’t enjoy it as much the second time around, as I think all that distance traveled to get to me made a difference in the taste.  I can’t wait for summer eggplant and tomato season to come around when eggplant and tomatoes are in their peak!!

Rigatoni with Eggplant Puree

Boeuf Bourguignon

Ever since I saw Julie and Julia years ago, I’ve wanted to try making boeuf bourguignon.  When Kevin and I visited Paris a couple years ago, we made sure to taste the authentically Parisian version of the dish.  As a new mom, “me time” these last few months has consisted of grocery shopping alone, working out once a week, and cooking.  My mother-in-law volunteered to watch Mia one Sunday morning so Kevin and I could have some time to ourselves.  Kev graciously used that time to scrub our house sparkling clean, and I decided to try my hand at the aforementioned quintessential French supper.  We are very exciting people, I know.

I had originally committed to using this recipe planning to use the slow cooker to finish the dish. However, Kevin kindly reminded me that I had yet to christen the Le Creuset dutch oven that we received as a wedding gift, so I decided to go that route.  It worked out because the prep took so much longer than anticipated that I would’ve missed the dinner window using the slow cooker anyway.  I’m also convinced that the dutch oven method yielded better results than the slow cooker would have.

This recipe is for the dutch oven method, so if you want the slow cooker version, you can find it here.

INGREDIENTS:

  • 8 ounces thick-cut bacon (5 to 6 slices), diced
  • 2 1/2 to 3 pounds beef chuck roast, round roast, or other similar cut (don’t cut into cubes yet)*
  • 1 1/2 teaspoons kosher salt, plus more for the meat
  • Freshly ground black pepper
  • 2 cups red wine, divided*
  • 2 medium yellow onions, thinly sliced
  • 3 medium carrots, diced
  • 3 medium celery stalks, diced
  • 2 cloves garlic, minced
  • 1 tablespoon tomato paste
  • 3 to 4 sprigs fresh thyme
  • 1 bay leaf
  • 1 cup low-sodium chicken stock, plus more if necessary
  • 1 pound white button mushrooms, sliced

To serve:

  • Chopped parsley, to garnish
  • Cooked pasta
  • Crusty baguette

DIRECTIONS:

  1. Heat a large skillet over medium-high heat. Add the bacon and cook until the fat has rendered and the bacon is golden and crispy. Remove the pan from heat and transfer the bacon to a paper towel-lined plate to drain. Pour off all but 1 tablespoon of bacon fat from the pan into a heatproof bowl and set aside.
  2. Pat the beef dry with paper towels, cut into steaks large enough to fit in your pan, and sprinkle with with salt and pepper. Return the skillet to medium-high heat until the bacon fat is shimmering. Add one steak at a time and sear on all sides, 2 to 3 minutes per side.

    Brown on All Sides
  3. Cut the beef into two inch cubes. Yes, two inches is larger than bite size, but tender meat is more important! Transfer the meat to the slow cooker or a large bowl. Deglaze the pan with 1/4 cup of the wine. Simmer, scraping the bottom of the pan with a wooden spoon, until the the browned bits are completely loosened. Pour the wine over the seared meat.

    Meat with Deglazed Wine
  4. Add 1 tablespoon bacon grease to the pan. Repeat with another cut of the beef, then deglaze with wine, and continue until all the beef is seared and cubed.
  5. When all the meat is seared, add 1 tablespoon bacon grease to the pan and reduce the heat to medium. Add the onions and 1/4 teaspoon of salt, and cook, stirring occasionally, until soft and browned, 6 to 8 minutes. Add the carrots and celery, and cook until softened, about 4 minutes more. Add the garlic and tomato paste, and cook for another minute. Transfer the vegetable mixture to the dutch oven with the meat.

    Ready for the Oven
  6. Wipe the pan clean with a paper towel and warm 1 tablespoon bacon grease over medium heat (if no more bacon grease remains substitute with vegetable oil). Add the mushrooms and 1/4 teaspoon salt, and cook, stirring occasionally, until they have release all their liquid, the liquid has evaporated, and the mushrooms are golden brown, 8 to 10 minutes. Transfer the mushrooms to a clean bowl and set aside — keep the mushrooms separate from the meat and onion mixture for now.

    Cook Until All Liquid Has Evaporated
  7. Arrange a rack in the middle of the oven and heat to 300°F. Transfer the beef and vegetable mixture to a Dutch oven or other heavy-bottomed 6-quart pot with a lid and stir in 1 teaspoon of salt. Tuck the sprigs of thyme and the bay leaf into the mixture. Pour the stock and the remaining wine over the beef and vegetables — the liquid should not quite cover the beef and vegetables; the ingredients should still be poking from the surface of the liquid. Add additional stock if necessary.
  8. Cover the pot and place in the oven. Cook for 2 hours, then begin checking the meat every 15 minutes. The dish is done when the meat falls apart easily with a fork. Exact cooking time can vary.
  9. Once the meat is cooked, stir in the reserved bacon and mushrooms. Simmer in the Dutch oven over medium heat until the mushrooms are warmed through, about 10 minutes.
  10. Serve in bowls over noodles or with crusty bread on the side. Sprinkle with parsley before serving.

    Beef Bourguignon

*NOTES:

  • Cubing the meat later: Instead of cutting the beef into cubes, I cut the roast into three steaks and browned each before cutting into cubes.  Browning the beef enhances the flavor, but it also dries out the surface of the beef cubes so the meat doesn’t fall apart as easily once cooked (even stewed in liquid!).  This extra step ensures good browned flavor and tender meat.
Gorgeous Chuck Roast
  • Choosing the wine: I used a dry pinot noir that I enjoy drinking that didn’t break the bank for this dish, but I’ve read that wines from Burgundy or Côtes du Rhône work well. The rule of thumb is to choose a wine that you also like to drink and you can’t go wrong.
  • Make ahead: The meat and vegetables can be prepared up to 1 day ahead and stored in an airtight container in the refrigerator until you’re ready to cook.
  • Storage: Leftovers can be stored in an airtight container in the refrigerator for up to 4 days or in the freezer for 3 months.  I doubt you will be able to resist not finishing this up in a couple of days!

Momofuku Milk Bar’s Compost Cookies

I’ve been lucky enough to dine at a few of David Chang’s eateries over the years – Momofuku Noodle Bar, Momofuku Milk Bar, and Momofuku Ssam Bar.  All were very memorable experiences in their own way, and I’m excited for Majordomo to open up in LA soon!  I loved the Milk Bar concept and still dream about that cereal milk soft serve.  My sister-in-law loves salty snacks and cookies, so I wanted to make a crowd-pleasing sweet and salty treat that wasn’t the usual Brown Butter Sea-Salted Rice Crispy Treats for the family get-together.  I remembered the Compost Cookie from my first visit to Milk Bar in New York and wanted to recreate it.

I followed the recipe exactly as written the first go around, and I thought the cookies were a bit too sweet for my taste and way too big.  The next time, I used a 1/4 measuring cup to portion out the dough and reduced the time in the oven.  I also used less butterscotch (which I thought overpowered the rest of the cookie a bit) and added pecans.  The original recipe came from an article in the Los Angeles Times if you want to use the original version. I’m sharing the recipe here with my tweaks:

MAKE THE GRAHAM CRACKER MIXTURE

INGREDIENTS:

  • 1 1/2 cups graham cracker crumbs
  • 1/4 cup milk powder
  • 2 tablespoons sugar
  • 3/4 teaspoon kosher salt
  • 1/4 cup (1/2 stick) melted butter, more if needed
  • 1/4 cup heavy cream

DIRECTIONS:

  1.  In a medium bowl, toss together the graham cracker crumbs, milk powder, sugar and salt with your hands to evenly distribute.
  2. In a separate bowl, whisk together the melted butter and heavy cream. Add to the dry ingredients and toss again to evenly distribute. The butter will act as glue, adhering to the dry ingredients and turning the mixture into a bunch of small clusters. The mixture should hold its shape if squeezed tightly in the palm of your hand. If it is not moist enough to do so, melt an additional 1 to 1 1/2 tablespoons butter and mix it in with the crust base.
  3. This makes about 2 cups crust base, more than is needed for the remainder of the recipe. Eat the base, or use as desired in other recipes. Store in an airtight container for up to one week at room temperature, or for one month in the refrigerator or freezer.

MAKE THE COMPOST COOKIES

INGREDIENTS:

  • 1 cup butter, at room temperature
  • 1 cup sugar
  • 2/3 cup light brown sugar
  • 2 tablespoons glucose or light corn syrup
  • 1 egg
  • 1/2 teaspoon vanilla extract
  • 1 1/3 cups flour
  • 1/2 teaspoon baking powder
  • 1/4 teaspoon baking soda
  • 1 teaspoon kosher salt
  • 3/4 cup mini chocolate chips
  • 1/2 cup mini butterscotch chips
  • 1/2 cup (1/4 recipe) graham crust
  • 1/3 cup old-fashioned rolled oats
  • 2 1/2 teaspoons ground coffee
  • 2 cups potato chips
  • 1 cup mini pretzels
  • 2/3 cup chopped pecans

DIRECTIONS:

  1. In the bowl of a stand mixer fitted with the paddle attachment, cream together the butter, sugars and glucose on medium-high speed for 2 to 3 minutes. Scrape down the sides of the bowl, add the egg and vanilla, and beat for an additional 7 to 8 minutes.
  2. Reduce the speed to low and add the flour, baking powder, baking soda and salt. Mix just until the dough comes together, no longer than 1 minute, being careful not to overmix the dough. Scrape down the sides of the bowl with a spatula.
  3. Still on low speed, add the chocolate and butterscotch chips, the graham crust, oats and coffee and mix just until incorporated, about 15 seconds.

    Add the Sturdy Add-Ins
  4. Add the potato chips, pretzels, and pecans and beat, still on low speed, just until incorporated, being careful not to overmix or break too many of the pretzels or potato chips. I found that giving the stand mixer a “pulse” or two to incorporate the chips and pretzels was enough to incorporate them but not break them up too much. (LA Times says you deserve a pat on the back if one of your cookies bakes with a whole pretzel standing up in the center.)

    Add the Salty Add-Ins
  5. Using a  1/4-cup measure, portion out the dough onto a parchment-lined sheet pan, spacing each portion roughly 4 inches apart.  I fit four per baking sheet after learning from this little disaster:

    When You Try to Cram Too Many on a Baking Sheet
  6. Pat the tops of the cookie dough domes flat. Wrap the sheet pan tightly in plastic wrap and refrigerate for at least one hour, up to one week. Do not bake the cookies while at room temperature because they will not bake up properly.

    I used a 1/4 Measuring Cup
  7. Heat the oven to 375 degrees F.
  8. Bake the cookies, one tray at a time on the center rack, 14 to 16 minutes, rotating the cookies halfway through baking for even cooking. The cookies will puff, crackle and spread while baking, and should be very faintly browned on the edges yet still bright in the center. Give them an extra minute or so if needed.
  9. Cool the cookies completely on the sheet pans before transferring to a plate or an airtight container for storage. At room temperature, the cookies will keep fresh for 5 days; frozen, they will keep for up to 1 month.

NOTE:  If you plan on freezing the extra dough, portion out the dough before freezing it or it will be very difficult to scoop into the measuring cups later.  Once the dough is cold, it really is hard to deal with!

Momofuku Compost Cookies

Creamy Leek and Potato Soup

The season of soups and stews is in full swing!  I’ve always been curious about trying a leek and potato soup, with its earthy flavors and creamy texture.  However, let me preface the rest of this post by saying that this isn’t Julia Child’s famous recipe.  I wanted a healthier version that didn’t use heavy cream.  I came across a vegetarian version of the soup on Life As a Strawberry, but used chicken broth instead of vegetable stock and also changed up the way I dealt with the potatoes.  On a gloomy day like today, I thought I’d share my version below!

INGREDIENTS:

  • 3 Tbsp. extra virgin olive oil
  • 2 leeks, roughly chopped (rinsed thoroughly to remove any dirt)
  • 4 large yukon gold potatoes, roughly chopped  (I used 3 red potatoes and 1 russet for this post because…that’s what I had in the pantry)
  • 2 cloves garlic, minced
  • Salt and pepper to taste
  • 2 cups chicken broth or stock
  • 1 cup milk

DIRECTIONS:

  1. In a large saucepan or pot, heat olive oil over medium heat.
  2. When oil is hot, add leeks, potatoes, garlic, salt and pepper. Sauté, stirring occasionally, for 3-5 minutes or until leeks have softened.

    Saute Leeks, Potatoes, and Garlic
  3. Add vegetable stock to pot and stir to combine.
  4. Strip leaves from thyme sprigs and add to pot. Stir to combine.
  5. Bring soup to a simmer and cook for 15-20 minutes until potatoes are cooked through and easily pierced with a fork.
  6. Add milk to soup and stir to combine.
  7. Remove soup from heat and carefully remove potatoes from the soup, and place them in a large bowl.  Mash potatoes with a potato ricer (or pastry blender in a pinch!).  Blend the remaining liquid contents of the soup in a blender until smooth, or use an immersion blender.

    Puree Leek Mixture
  8. Stir riced potatoes back into the soup, and season with salt and pepper as needed.*

    Mash Potatoes Separately

*I don’t like the idea of blending potatoes, because the blending process changes the potato texture to be gummy.  This soup won’t be silky smooth, but I prefer that texture to that of gummy potatoes.  That being said, if you don’t mind that glue-y texture and really need the soup to be silky smooth, use an immersion blender to blend all ingredients together in step 7 instead of removing the potatoes and mashing them separately.

Yes, I am fully aware of how very not photogenic this soup is.  We can toss this into the as-tasty-as-it-is-ugly category!

If your soup is too thick after blending, thin it out with a splash of milk or vegetable stock. Too thin? Bring it back to a simmer and cook until it’s reached your desired consistency.

This soup is easy to make in advance and it freezes well.

To make this soup vegan, replace the milk with additional vegetable stock, coconut milk, or almond milk, and omit the heavy cream.

Smoky Caramel Popcorn

I didn’t have as much time to bake this year with our new little roommate to tend to, but it wouldn’t have felt like a holiday season without making SOME sort of treats.  I had to make the usual batch of Furikake Chex Mix and tried out a David Chang/Momofuku cookie recipe (coming soon).  My mother-in-law volunteered to watch Mia on Black Friday so that Kev and I could go out on a date, and we took her up on it.  When we mentioned we were thinking of going to brunch and a movie, she asked us to pick up a tub of her favorite Arclight caramel corn.  With that in mind, I made a mental note to find a good candied popcorn recipe when Christmas came around.  I wanted to make something a little different and came across this recipe for a Smoky Candied Popcorn on Kitchn.
The amount of chili powder in the recipe is perfect – it’s not spicy at all and just adds a subtle hint of smoky flavor.  I followed the recipe to a tee the first time, and it was delicious.  However, I wanted to take the smokiness level up a notch without the possibility of creating spiciness by having too much chili powder.   With my newfound love of smoked paprika, I added a quarter teaspoon in to the dry mix.  And who doesn’t like a good salted caramel?  I added another 1/4 teaspoon of sea salt to the recipe too.  This popcorn is like crack.  I’ve made it three times in the last few weeks and can’t get enough of it!
Hope you can enjoy it too!  Here’s the recipe, as adapted from Kitchn:
INGREDIENTS:
  • 10 cups popped popcorn (8 cups if you like your popcorn more candied)
  • 3/4 teaspoon chili powder
  • 1/4 teaspoon smoked paprika
  • 1/2 teaspoon baking soda
  • 3/4 teaspoon fine sea salt
  • 1 cup granulated sugar
  • 1 tablespoon light corn syrup
  • 1/2 cup (1 stick) unsalted butter

DIRECTIONS:

  1. Line a large (18×13-inch) baking sheet with parchment paper or a silicone pan liner. Place the popcorn in a large bowl. Mix together the chili powder, smoked paprika, baking soda, and salt in a separate tiny bowl and set aside.
  2. In a heavy-bottom pan over medium-high heat, combine the sugar, light corn syrup, and butter. Cook 10 minutes, occasionally swirling or stirring with a rubber spatula, until it all melts into an amber-hued caramel and pulls away a bit from the side of the pan. This mixture will be super hot, so be careful not get any on your skin.

    Caramel Caramelizing
  3. Remove from the heat and carefully whisk in the chili powder, smoked paprika, baking soda, and salt — the mixture will bubble up, so be careful.

    Whisk in Spices, Baking Soda, and Salt
  4. Quickly pour the caramel over the popcorn and toss with a rubber spatula to evenly coat all the popcorn kernels. Once coated, carefully spread the popcorn onto the parchment-lined baking sheet, separating any large clumps that came together.
  5. Let cool 15 minutes if serving immediately or 2 to 3 hours to cool completely before wrapping and gifting. Store in an airtight container up to 3 days.

    Smoky Caramel Popcorn